Magnetic Knife Holder
Build your own magnetic knife block and organize your kitchen in style!
1. Gather tools and materials needed to build knife holder
Tools
- Saw - Prepare a table saw or miter saw/chop saw to make the main cuts in the wood.
- Router - Used for rounding or patterning edges.
- Drill - For easily driving in screws and drilling pilot holes.
Materials
- Wood - Choose wood type to your liking based on color, grain, etc. and a size large enough for your knife storage needs.
- Magnets - Disc or block magnets based on your design. Use the table below or our magnet finder to quickly find a certain size.
- Adhesive - Some type of glue, adhesive or epoxy for securing the magnets to the wood.
- Screws - Enough screws to secure pieces of wood together
2. Step by step build guide for magnetic knife holder
-
Cutting wood
Cut a block of flat wood to size. Ours is 2" tall & 16" wide, from 3/4" thick cherry. In hindsight, 18" wide might be nicer.

-
Create a jig
Create a fixture for cutting the groove in a nice, straight line.

-
Cut groove in wood
Cut with the router to make the groove. Set the depth properly to leave the desired thickness of wood. We left 1/16" thickness of remaining wood.

-
Round or pattern edges
All major cuts on the blocks are finished. A rounded edge all around was made with a router. You can also use the router to make other patterned edges.

-
Align magnets in a row
Place the magnets in a row with alternating polarities. As you look at the magnets, the poles will be north, south, north, south, etc. The edges attract in this orientation, and don't repel each other. Use a steel sheet (a.k.a. baking pan) to help keep the magnets in place during assembly.

-
Glue magnets
While many different types of adhesives will work well, a silicone adhesive is used here.

-
Finish wood
The nearly finished product, hung on the wall for testing. Still need to oil the wood and use nicer screws.

Shop Neodymium Magnets for Other Applications
Selection of strong rare earth neodymium magnets perfect for organizing your home or office.


3. Choosing the right magnets for your magnetic knife holder
Optimize magnet size
The right magnet size depends on a number of factors, including:
- Magnets: The number of magnets used
- Knives: The size, shape and weight of the knives to be held (here we plan for typical kitchen knives)
- Gap: The thickness of the material between the magnets and the knife -- this is the most important factor!
- Design: Whether you use a single row or multiple rows of magnets etc.

Best knife block magnets for most common wood thicknesses
-
D83 Knife Block Disc Magnet

Best magnets for 1/16" (1.6mm) thick wood
Diameter: 1/2" (12.7mm) Thickness: 3/16" (4.8mm) Strength: 9.14lb (4.1kg)
Shop Now -
DA4 Knife Block Disc Magnet

Best magnets for 1/8" (3.2mm) thick wood
Diameter: 5/8" (15.9mm) Thickness: 1/4" (6.4mm) Strength: 15.3lb (6.8kg)
Shop Now -
DF4 Knife Block Disc Magnet

Best magnets for 1/4" (6.4mm) thick wood
Diameter: 15/16" (23.8mm) Thickness: 1/4" (6.4mm) Strength: 25lb (10.7kg)
Shop Now
On the back side of the block, we cut a groove that left a wood thickness of about 1/16". A long row of D83 magnets were used, which have a nice feel. Thinner D82 magnets would also have worked well. An initial build with D84 magnets also worked, but seemed to pull a little too hard. The stronger the magnets, the more the knife will *snap* to the wood. We also didn't want to have to pull too hard when removing a knife. It all comes down to personal preference.
Wood thickness effect on magnets
What if I have a different thickness of wood?
Many folks email us about using thicker pieces of wood. You can certainly do this, but you'll need a much bigger magnet to get the same pull on the knife at the wood's surface due to a larger gap.
We've compiled the below magnet strength per thickness chart as a guideline for what size magnet you'll need. It's based on our own experience building this knife block, and what seems like a nice strength to us. Your ideal strength might be a little different than ours, but this should get you close.

For example, our wood thickness (shown on the bottom, x axis of the graph) is 1/16" or 0.0625". For a magnet thickness of 3/16" (0.1875"), go straight up from 0.0625" until you hit the pink line (which is for all 3/16" thick disc magnets). It hits right at the D83, across from a diameter of 0.5".
We could just as well used the slightly weaker D74, or the stronger D84 or D93.
What about 1/8" (0.125") thick wood? From this chart, I start at the 0.125 wood thickness along the bottom of the chart. Move straight up until the line for the desired magnet thickness is reached. I like 1/4" thick, so I stop at the yellow line. Move left to find the required diameter, and hit 5/8" diameter. A DA4 magnet should work nicely. Of course, a D88 or DF2 would work too. DA4 is probably my first choice.
Doing your own custom calculations
To compile this chart, we used our magnet calculator and a bunch of assumptions. The D83 worked well in our tests, and the magnet calculator figures that the D83 pulls with about 2.67lb to a steel plate that's 1/16" away. For a lot of reasons, that's not exactly the real pull force I would measure. The calculator assumes one magnet and a big steel plate. This knife holder has a series of alternating magnets attracting to thin, stainless steel knives of varying dimensions. It's apt to be completely wrong! It can be used to give an apples-to-apples comparison.
For example, a thinner magnet with a bigger diameter (the DA2) pulls with about the same force to a steel plate at 1/16" distance as a D83, as indicated by the calculator. Therefore, it's probably a good assumption that a row of DA2 magnets will behave very similarly as the D83 magnets.
What if I want to use block magnets?
Yes, block magnets can work just as well. To compare the strengths, just compare the pull force case 1 strengths listed for a block to the disc magnets referred to in this article. For example, a B664 magnet has almost the same pull force listed as the D83.
Finishing the wood
The choice of how to finish the wood is up to you. We chose not to mess with stains or polyurethanes, using oil to preserve the wood's natural beauty. While linseed, walnut, Danish and teak oils are popular wood finishes, we chose mineral oil. It is often recommended for cutting boards, which sounded very similar to us. It might not preserve as well as some other oils, but it's non-toxic and avoids nut-allergy issues. Mineral oil may need occasional re-application, though our knife holder has withstood a few years of household use quite well. Avoid olive or other vegetable oils which can turn rancid over time.
4. See the completed magnetic knife holder in action
Below you can see what a completed magnetic knife holder may look like. Have you made your own version of a magnetic knife holder? If so, feel free to share it with us via email and we may even feature it in this very article!
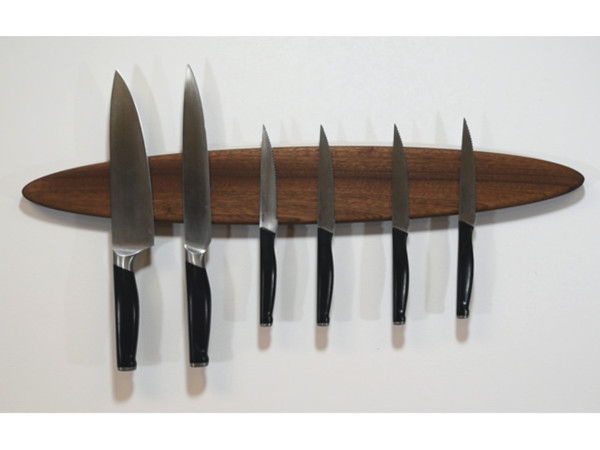
Completed magnetic knife block
Knife holder magnetic field
This image is a picture showing what the magnetic fields would look like attracting to the knife in our magnetic knife holder. The poles are staggered to be north then south for increased pull force. The gap between the magnets and the knife represents the thickness of the wood.

5. Other design ideas for magnetic knife holders
- Construct a holder out of glass, acrylic or Lexan (polycarbonate). It might be cool to see the magnets!
- Many different methods of attaching the holder to the wall are possible, including magnets!
- Multiple rows of smaller magnets could be used, instead of one row of single magnets. This can also help prevent spin if the row are spaced out.
- While most of the kitchen knives we've encountered are ferromagnetic (attracted to magnets), there are some types of stainless steels that are not. Check and be sure that a magnet will stick to your favorite knife.
- Without the tools to cut a groove to a specific depth, a block could be constructed out of wood veneer. Use a thin piece of wood for the front surface, and glue the structure behind it.
- Some folks aren't interested in building a wood block, but still want to use neodymium magnets to hold their knives safe and clean. A simple, plastic coated disc magnet like our RX034DCSPC-BLK can make for a great, one-knife solution.


