We are now required to collect sales tax in several states. Learn more about tax exempt status for your business.
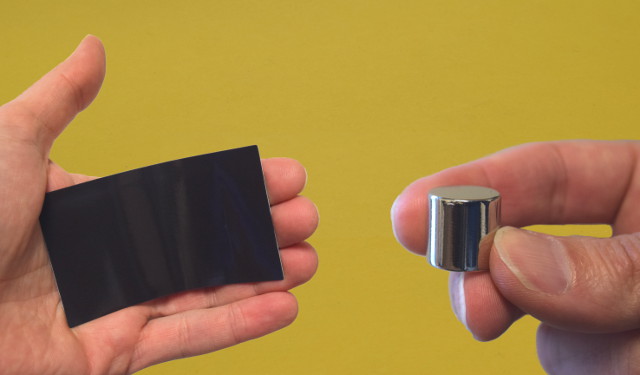
Can a flexible refrigerator magnet be re-magnetized using neodymium magnets? Yes! Read on to learn how.
We’ve been asked this question a number of times, so it seems like a good idea to demonstrate the process. We’ll use a handful of neodymium magnets to re-magnetize a flexible magnet. While there's a slicker, faster setup used in the manufacturing of flexible magnets, our demo shows the basic idea. When companies manufacture large sheets of this stuff, they use a very similar process to magnetize larger sheets.

Unlike the neodymium magnets we provide, flexible magnets are not made with rare earth elements. They are a mix of ferrite powder (think ferrite or ceramic magnets) mixed into a rubber or polymer resin. It’s magnet material dust mixed into a flexible plastic sheet.
They’re often sold in rolls, like tape, or in sheets. Many are sold with one side that can be printed on, which is why you see so many graphics on them. Most magnets you see on the backs of cars are made with this kind of flexible magnet material.
No. They are not nearly as strong as a neodymium magnet in several important ways. First, let’s consider pull force. The pull force is much, much weaker than a neodymium magnet. Depending on how you measure it, a neodymium magnet is going to be roughly 7-20 times stronger than a flexible magnet of the same size. In some cases, this number can be even higher.
Of course, flexible magnets don’t have to be very strong to just hold themselves on the back of your car. They’re not lifting very much. They don’t stick out into the wind. They are really great for funny bumper "stickers." Just don’t expect to lift heavy weights with one.
Longtime readers of our blog know that pull force isn’t the only important measure of a magnet’s strength. Coercivity is also key. Coercivity is a magnet’s resistance to getting demagnetized by a magnetic field. The greater the coercivity, the stronger magnetic field you need to magnetize (or de-magnetize) it.
For example, rubbing a strong magnet across a credit card’s magnetic strip can erase the information on it. That’s because the strip’s coercivity is low. It is unable to resist the magnetizing field from the magnet.
Flexible magnets are the same way. Because their coercivity is low, they’re easily influenced by a powerful neodymium magnet.
Before we show how to remagnetize a flexible magnet, let’s take a look at how they should be magnetized in the first place. Back in our article about Halbach Arrays, we showed how flexible magnets are magnetized in multiple directions. They’re not magnetized in one direction throughout, like a simple neodymium disc magnet.
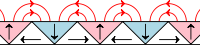
Flexible magnets are magnetized in alternating patterns, where the polarity changes as you move to different positions along the surface. If you could make yourself really small and walk around the surface with a tiny compass or pole identifier, you would see alternating north and south poles.
No, not if you want the flexible magnet to work. Remember, these things aren’t very powerful. If you magnetize it all in one direction, it’s not able to provide much magnetic strength at all. It won’t stick to the fridge door.
By magnetizing flexible magnets in alternating directions like this, you can get a good amount of strength from what would otherwise be much too weak. It’s actually quite ingenious. The alternating fields both give it more strength and help it to resist demagnetization.
Back in our article about horseshoe-shaped magnets, we used a neodymium magnet to re-magnetize an Alnico horseshoe magnet. It was pretty simple to pick which pole to touch the horseshoe magnet. When we stick one pole of the strong neo magnet against the weaker horseshoe magnet, it is magnetized in the direction of the field it sees.
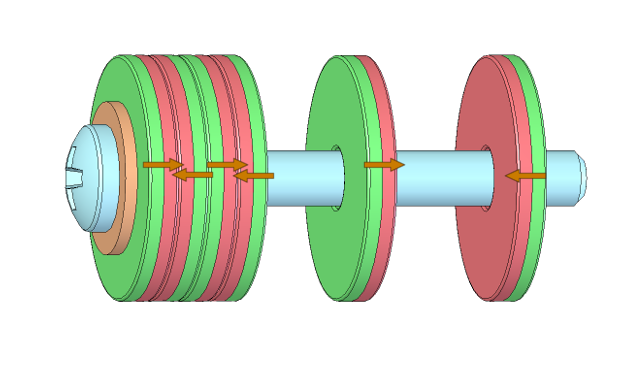
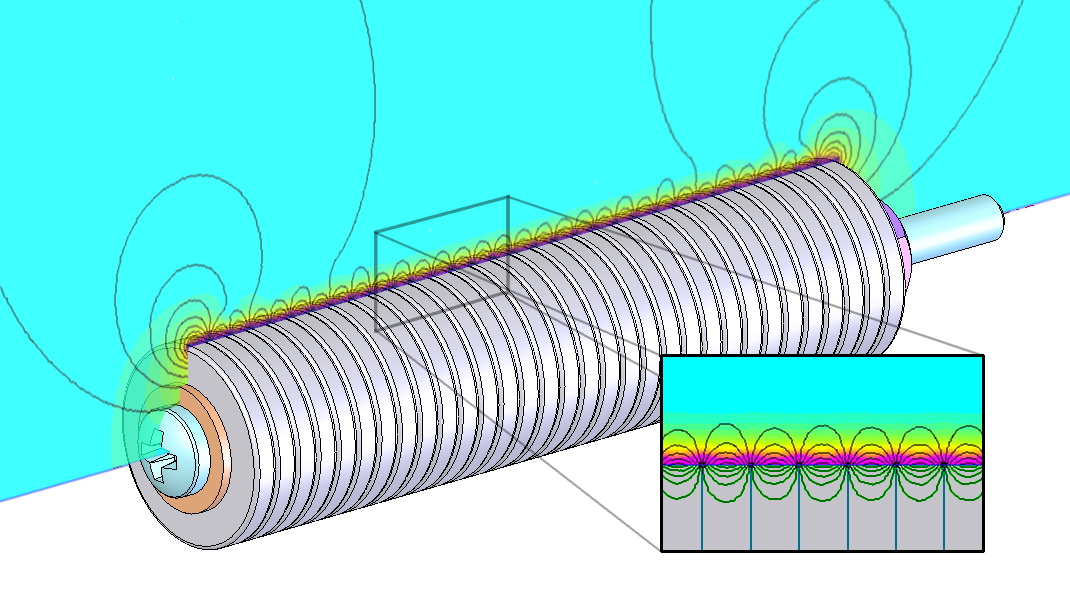
For the flexible magnets, we need a way to make the strip “see” that alternating pattern. How can we do that? By stacking a bunch of thin disc or ring magnets together, arranged so that they are repelling one another. This makes a strong magnetic field along the edge of the stack, shaped in exactly that alternating pattern we want.
This is a bit challenging to assemble, since the magnets act to repel each other apart. We use a long screw and nut to hold the stack together.
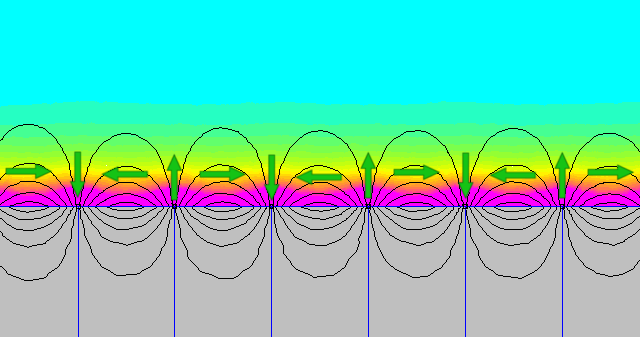
Now that the stack is assembled, let’s visualize what the field looks like right near the curved surface of the cylindrical stack of magnets. The black lines of flux indicate the field direction at a given point. The field direction is parallel to those black lines.
If you move from left to right along the surface, you see the field direction changing. In the lower picture, the green arrows show the field direction. Say, that looks a lot like a Halbach array!
If we roll or slide a flexible magnet right up against this stack of neodymium magnets, the flexible magnet will “see” that strong magnetic field in the directions shown. After the stack of neodymium magnets are slid away, the flexible magnet retains magnetization in those directions.
In the video below, we:
That video used R821 ring magnets and the MV43 viewing film.
Flexible magnet manufacturers tend to favor that pattern of long stripes, mainly because it’s easy to magnetize big sheets quickly. Just roll the sheet across the array of neodymium magnets, and viola! You’re done.
To make things a little more interesting, we can also make other patterns. If they’re alternating patterns, they can also provide good strength. In the video below, we magnetize it with a checkerboard pattern of north and south, plus a few other silly patterns.
That video used MV43 viewing film, D28 and D18 cylinder magnets to draw things, and an array of B224 magnets for the checkerboard.


 Cart
Cart