We are now required to collect sales tax in several states. Learn more about tax exempt status for your business.
The contest winner for November 2010 is Jim K. from Westborough, MA. We've heard about a number of great magnetic spice racks. Using neodymium magnets to mount spice containers is becoming increasingly popular. You can find many DIY examples out there with a quick search (like this or this). What sets this one apart is it's hands-free design.
When grabbing spices from a typical spice rack, I still have to unscrew the top to shake or spoon some out, and then screw the top back on. Dealing with the tops is a two handed task which isn't easy when I'm in the middle of cooking and I have a greasy hand or I'm stirring something that might burn if I stop. I wanted a spice rack I could access with one hand.
Enter K&J Magnetics. Once I saw your RX4C2, I knew I could make my idea work.
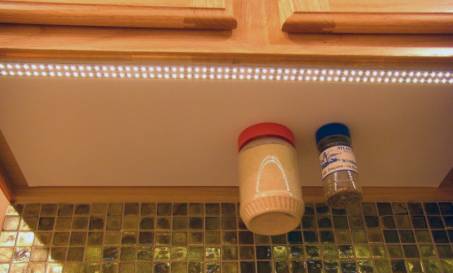 |
| Completed Under-Cabinet, One-Handed Spice Rack. The white surface under the cabinet is the steel sheet, covered with a white shelf liner. |
First I bought a sheet of steel from my local hardware store and cut it to size, for my cabinet that was about 22 inches by 10 inches. I used 14 gauge which was thicker than I needed, 18 gauge would probably be good enough and easier to work with. Make sure all edges are smoothed and surfaces are clean. [While your local hardware store is probably the best bet, you can also order steel sheets online. Try searching for items like 6544K12 at McMaster.]
Also get some shelf liner. You want a smooth surface with a little give, about 0.05 inches thick. I used Duck brand Solid Easy Liner, cut to the same size as the steel.
To mount the steel on the bottom of the cabinet I drilled and countersunk six holes around the edge; four in the corners and two in the middle of the long sides to accommodate flat head wood screws of appropriate length. I also added some double-sided tape between the steel and the cabinet, as I didn't want the steel to rattle against the cabinet.
Cover the entire surface with more double-sided tape and carefully align the shelf liner and adhere it to the steel, carefully smoothing out any bubbles.
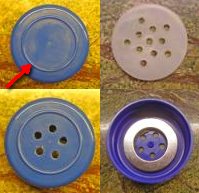 |
| Clockwise from upper left: The unmodified cap with a ridge; the included interior cap with holes, modified cap with RX4C2 magnet, modified cap with 5 holes. |
I have a collection of empty plastic spice jars, or you can buy them in bulk. [Online, or through their printed catalog, Penzeys has great spices in containers that can be modified like this. They also sell empty jars.] They should have a raised ridge around the top -- this is what is going to create an air tight seal against the shelf liner material.
The usual shaker insert has more holes, and the magnet has only a ¾ inch inner diameter. Mine had five holes near the center, so using that as a template, drill corresponding holes directly in the lid of the jar. Then enlarge the holes, since there will be fewer of them, adjusting for a good flow of spice.
Clean the lid and the magnet, and using more double sided tape, fasten the magnet, centered, on the inside of the lid. Cutting off the top section of a jar and screwing it into the lid can make a guide to help place the magnet.
For a larger, spoon-able container I used a peanut butter jar, which again has a ridge around the perimeter. Carefully use a hobby knife to cut a half circle hole that accommodates your measuring spoons. I used eight D82B-N52 1/2" diameter, 1/8" thick N52 magnets, which I deemed strong enough to hold a full jar of fairly dense spice, like granulated garlic. A couple of the magnets here slid out of place, but that hasn't affected how well this works. Perhaps a thin sheet of plastic with guide holes might hold the magnets in position better.
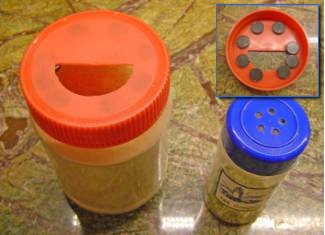 |
| Larger Peanut Buttter Jar, with D82B-N52 magnets adhered to the inside. |
All I need to do now is modify more jars and make some labels. Since the jars are under the cabinet, the labels should be placed near the bottom of the jars where they'll be more visible.
We received quite a few entries for this, our first monthly magnet contest. Some of the others we received were also quite good, so we're going to keep them in the running for next month's contest.
Thanks to everyone who participated. Keep experimenting, keep building, and be sure to enter your idea in next month's contest for your chance to win free magnets! See our original post for details on how to submit your idea.


 Cart
Cart