Mendocino Motors
Part 2!
In this second installment about the Mendocino motor, we add solar panels and coils of wire to get this motor spinning. If you haven't read the first part, see the article: Pseudo-Levitation. That article describes how to levitate the motor's spinning shaft using neodymium magnets.
Review: What is a Mendocino Motor?
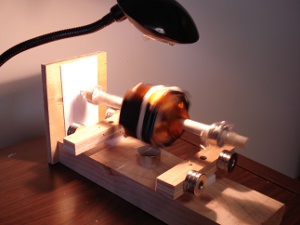
The Mendocino Motor is a magnetically levitated, solar powered electric motor. It was first made by inventor Larry Spring of Mendocino County in California, for which it is named. (Technically, he lived in Mendocino county, not the town of Mendocino, but that's the name that stuck with the motor.)
The motor consists of a spinning shaft that is held up by repelling magnets, stabilized by resting a point against a wall. It is powered by solar panels mounted on the spinning shaft, which generate currents through coils of insulated wire.
How does an electric motor work?
Like many electric motors, the Mendocino motor consists primarily of two magnets.
- One magnet is a permanent magnet that provides a steady magnetic field. In fact, that's why they're called "permanent magnets", because the field stays on all the time.
- The second magnet is a coil of wire that acts as an electromagnet that we can switch on and off. When a current is running through this coil of wire, it acts like another magnet, complete with a north and south pole.

Magnetic Forces in an electric motor
Let's forget about the electromagnet for a moment. Just imagine setting two permanent magnets near each other. One will remain stationary, while the other is free to rotate on a shaft, right next to the first. Magnetic forces will tend to try to rotate the freely spinning magnet to align its magnetic field with the stationary magnet's field.
We demonstrate these forces in the video below using color coded D68PC-RB magnets.
What is the torque on this rotating magnet at various positions? How strong are the magnetic forces trying to rotate it? In the graphic showing various rotational positions below, we can see where the torque is highest, and in what direction. The torque shown represents the torque acting on the rotating magnet in that position.
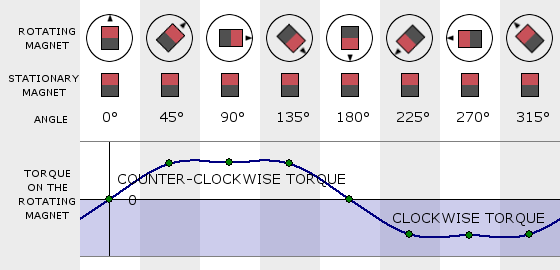
Let's get back to that coil of wire idea, an electromagnet we can switch on and off electronically. If we replace one of these magnets (let's pick the spinning one) with an electromagnet, we can switch the electric current on and off at various portions of the rotation cycle. We should be able to turn on the electricity to try and spin it in one direction, spinning the motor shaft.
When should we turn the electric current on? In which direction?
In the graphic below, we change the rotating magnet into an electromagnet, represented by the classic example of wire wound around a nail. In one region, from 45 to 135 degrees of rotation, we run current through the electromagnet in one direction. To keep trying to rotate the spinning electromagnet in the same clockwise direction, we run current in the opposite direction in the 225 to 315 degree region.
Because we run the current in opposite directions, the torque is always turning the shaft in one direction. During the "off" periods, inertia of the spinning motor has to be enough to get it to the next "on" cycle for it to keep spinning.
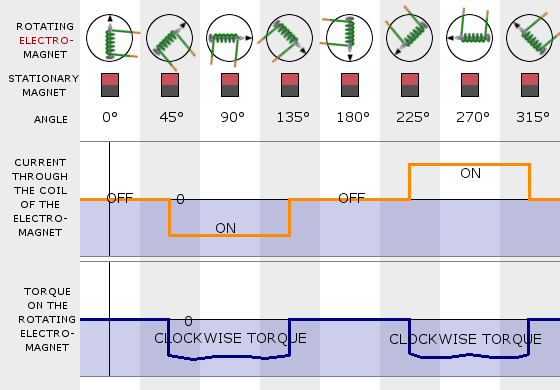
In brushed DC motors, conductive brushes are set up to make contact from an electrical source to the coil of wire. With brushes setup to only make contact during those times in the rotation cycle that will help it rotate, the motor will spin powered by the electric current provided.
Modern brushless DC motors work using similar on/off cycles, but use other means to figure out where in the cycle the spinning motor is. From Wikipedia:
Because the controller must direct the rotor rotation, the controller requires some means of determining the rotor's orientation/position (relative to the stator coils.) Some designs use Hall effect sensors or a rotary encoder to directly measure the rotor's position. Others measure the back EMF in the undriven coils to infer the rotor position, eliminating the need for separate Hall effect sensors, and therefore are often called sensorless controllers.
Solar Panels solve the control problem
Because a Mendocino motor uses solar panels that receive light from above, they can be arranged so that the spinning panels themselves provide the on-off cycling of power. Because the panels rotate in a Mendocino Motor, the spinning panels moving into and out of a light source. This automatically handles the switching on and off of the current to the coils of wire. We just have to set them up so that the coils are switched on at an opportune time.
How to wire the solar panels and coils of wire
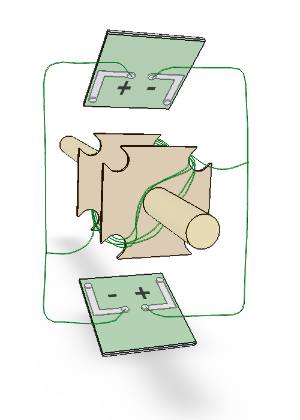
We wired the panels as shown in the sketch below. The sketch shows just one set of panels with a single coil of wire. The coil only shows a few turns, for clarity. In the motor we constructed, we added a second set of panels and coil of wire in the same fashion.
Technical Details: Choosing Solar Panels and Magnet Wire
What solar panels should be used? How many turns in the coils of wire? What wire gauge should be used? This is where things get complicated. The answers to all these questions are interrelated in all sorts of interesting ways.
We found a few Mendocino motor examples online, where builders include details about what kind of wire they used and how many turns. Many of them show some really dazzling workmanship, much better looking than our rough example! It seems like 100 turns of wire is most common in the descriptions we've seen online. What we couldn't find was a justification that explained why that many turns were used.
By the way, magnet wire is the common name for the single-strand, solid copper wire that has a laquered-on insulation around it, commonly used for motors, transformers, etc. UPDATE: We now offer this kind of wire in our Magnet Wire section!
Before ordering parts for the motor, we had to somehow decide: What solar panels should we get? What gauge of wire? We did some theoretical analysis, comparing various solar cell specifications with various wire gauges and number of wire turns. The results really depended on the interesting ways solar panels work, as well as the shape and design of the motor.
The Math:
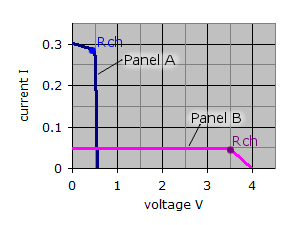
Solar panels like these have a performance curve that describes what they are capable of. On this curve is an important point called the, "characteristic resistance." If you hook up the panel to a resistor with that value (or some load at that resistance), you'll get the most power from it. Therefore we choose a length of magnet wire that had a resistance equal to that spec.
In the graph at right, that resistance occurs right at the bend of each panel spec. While both panels represented can offer a similar amount of power (Watts), one will offer higher currents at a lower voltage, while the second offers a much lower current but at a higher voltage.
We take the electricity from the panel and run it through a coil of thin
magnet wire, consisting of many turns around a loop. When sitting in a
magnetic field (near a magnet), a torque can be felt in that loop of wire. How
much torque? The maximum torque, at the angle where maximum torque is found,
can be expressed as
 , where
- N = the number of turns of wire
- I = the current through the wire
- B = the magnetic field within the loop of wire
- A = the area of the loop
For each case, we analyzed what the optimum number of coils of wire would be, and computed a theoretical torque value we might expect it to provide. While not perfect, it was a decent way to compare the two options. While interesting, the analysis gets into more detail and electrical engineering that probably contains too much math for a blog article, so we won't go into it much farther here. If you are interested in walking through our thought process, you can download this pdf describing our analysis.
The solar panels and magnet wire we chose was...
We chose a solar panel with higher voltage and lower current ratings. This was shown as "Panel B" in the graph above, and as "SZGD5433" in the PDF. We ordered them from a distributor called Futurlec. We don't have a relationship with them; they're just a place we found solar panels online for a great price.
We chose 30 gauge (30AWG) magnet wire and used about 1,000 turns in each coil. This was more turns of wire, and heavier than most motors we've seen. There are some great looking motors online that use as little as 100 turns. That's a good thing if you don't want to use such big magnets - our floating piece weighed in at half a pound. Copper is heavy!
You can find 30 gauge wire like this as MW30-4 in our Magnet Wire section.
In hindsight, it may have been better to design around less coils of wire. Not only did winding 1,000 turns (twice!) take a long time, but the advantages of greater torque might have been outweighed by the much heavier weight of the assembly. It takes more torque to rotate the heavy rotor!
We haven't built a second motor, but we suspect you could use the same panels we did with less turns of wire. You'll get less torque, but then, you also won't have as heavy a mass you're trying to rotate.
The Build

We constructed the rotor frame from light wood, held together with hot-glue-gun glue. It may not be the most accurate construction method, but it was a fast way to experiment with an easily modifiable prototype quickly. We used thin wood from a craft store that was easily cut with a hobby knife.
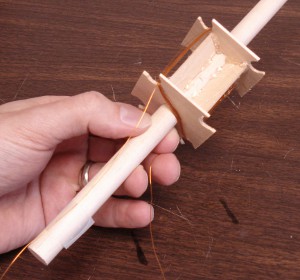
Start winding the copper wire around the rotor. We made ten turns while keeping the wire on one side of the 1/2" diameter shaft...

...and then ten turns on the opposite side of the shaft.

Winding the wire, we kept a tally on paper to avoid losing count.

Make the same winding on the opposite position, crossing the first winding.

Label the wires so that you can keep track of the direction of the coil and which wire is which. Here we show the first solar cell with wires soldered in place. The tape is there only to prevent tugs on the solder joint during assembly.

Here is the final solar cell, soldered but not yet assembled into position.
Watch It Go!
In the video below, we set the completed rotor on top of the motor base. Because the rotor assembly was so heavy, a bit over half a pound, we increased the size of the magnets used for both the rotor and the base. The rotor uses two RX088 ring magnets, 1" outside diameter x 1/2" inside diameter x 1/2" thick. On the base, we stacked three RX033CS-N magnets together to form a taller magnet, in four locations.
We show two different magnets set beneath the coil to provide the magnetic field. By hand for our initial testing, see the 1-1/4" diameter x 1" thick DX4X0 magnet held in place. A shorter, 1-1/4" diameter x 1/2" thick DX48 magnet was attached more permanently to the base.
Notes, Conclusions and Other Thoughts
Most brushless DC motors are built the opposite way, where the coils of wire stay still and the magnets spin. Since the power source doesn't typically spin around with the rotating portion like our solar panels do, it's easier to construct. They work with the same principles, though.
The torque this motor provides depends on the magnetic field within the coil of wire. If we can make the magnetic field bigger, it will spin better. One idea we never got around to trying was to use 2 permanent magnets, one above and one below the spinning coil. A setup like this might produce a stronger, more uniform magnetic field. You might even be able to use smaller magnets with a setup like that. Since we have a lot of big magnets, we took the easy route and just stuck a big magnet under it!
While we enjoyed building this demonstration motor, it didn't turn out to be something good enough to leave sitting on the windowsill. The rough construction shown just isn't balanced well enough, and will tend to oscillate out of control over time. Careful balancing may be the most challenging part of building a successful Mendocino Motor.
Depending on the initial position, the motor may or may not get started on its own. There are big "dead zones" where it doesn't get enough torque to start spinning, and needs a hand start. Maybe a hexagon-shaped motor with 6 solar panels and 3 coils of wire might make for a better, self-starting motor.
We've seen a few setups that use three magnets in the base arranged in a triangle pattern. The third magnet is added above the rotor shaft's magnet. Would a setup like this help reduce wobble in the shaft? Initial experimentation suggests it might, but we don't have a conclusive answer on which is better. We still saw wobble with the third magnet, but it wobbled a bit differently.
The size of this motor might have been overkill. If we get a chance to build another one, we would like to use a smaller shaft (maybe a pencil), less turns of magnet wire (for lighter weight) and smaller magnets. This would help reduce the cost and build-time required for the project.
Parts List
Here is a brief list of what we used to build our Mendocino Motor. For the rotor (the spinning portion of the motor):
- 1/2" diameter wood dowel rod, purchased from a local hardware store
- thin wood from a craft store, able to be cut with a hobby knife
- hot glue to hold the pieces together (do not use hot glue on neodymium magnets!)
- 30 gauge insulated magnet wire, MW30-4
- four solar cells from Futurlec, SZGD5433
- two RX088 ring magnets
For the base:
- Wood for the base and wall
- Thin piece of aluminum for the wall
- twelve RX033CS-N magnets. Alternatively, RX038DCB-N52 magnets might also have worked well. Still, we like planning on stacking multiple thinner magnets. This lets you adjust the strength by altering the number of magnets used in each stack.
Thanks for following along with us! If you build a Mendocino motor of your own, please send us a photo! We'd love to see it. Be sure to let us know if we have permission to use your photo here.
