We are now required to collect sales tax in several states. Learn more about tax exempt status for your business.
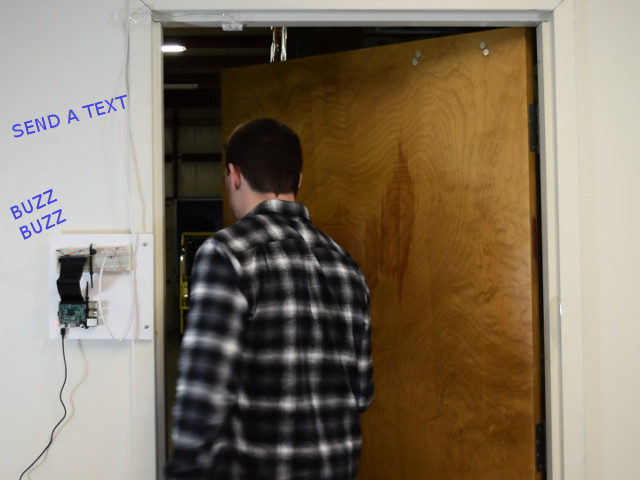
Let’s kick off the new year with a fun magnet project: Building a home alarm system using magnets, sensors and a Raspberry Pi. We’ll walk through the process step-by-step, sharing what we’ve done to make it all work. We use a magnet and a reed switch to sense when a door or window opens, and send an email or text message to alert us.
Hopefully this will be a good starting point for building your own system. In the process, we’ll also learn a bit more about how magnets work in professional alarm systems by building one ourselves.
In the end, the elements described here might be used in all sorts of systems, not just security alarms. Maybe you put the magnet on a float and sense hot water heater failures or sump pump failures. Your imagination is the limit!
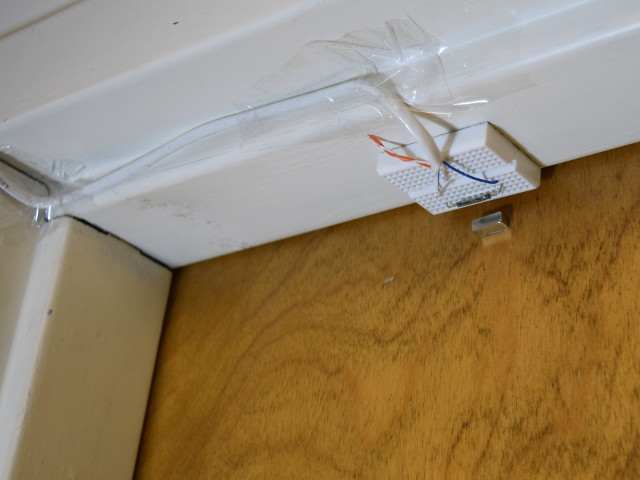
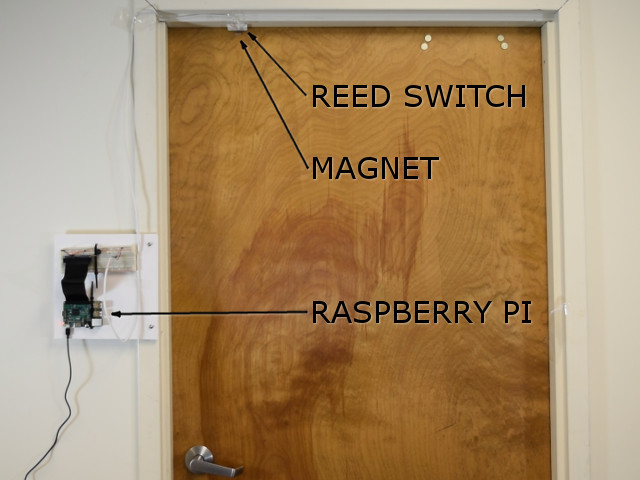
In our test rig, a magnet is attached to the moving door. A reed switch is affixed to the stationary door frame above the magnet.
What’s a reed switch? It is a device that closes a switch when a magnet is nearby, but opens it when the magnet is gone. We used this one, purchased from Digikey, a supplier of all sorts of electronics. Learn more in our earlier article about Reed Switches and Hall Effect Sensors.
We placed a B338 block magnet near this reed switch. It worked well in our testing, able to activate the reed switch from a reasonable distance. This magnet closed our reed switch when it was a bit less than one inch away.
The magnet is placed directly abeam the glass reed switch, with the long axis of the magnet parallel to the switch. We chose magnets magnetized along the longest dimension to make the magnetization direction obvious.
It depends on the sensor you’re using and the desired operating distance. With the little B338 magnet, you have to get the magnet fairly close to the sensor to trip it. If you need the magnet to activate the switch from farther away, choose a bigger magnet.
We chose a relatively small magnet to keep the cost of this project low. It didn’t matter much for our single door setup, but the magnet costs would add up if you have a house with a lot of windows!
The video below shows our complete working system, plus a demonstration of how different magnet sizes will affect the operating distance. The bigger the magnet, the farther away it can close the reed switch.
Magnets shown in that video include B228, B338, B448, B44X0, B668, B88X0 and B88Y0.
Now that we have a working, no-contact sensor setup, how can we gather this information and send notifications about the door's status? We could hook it up to a PC, but that seems overkill for this project.
For a less expensive solution, we turned to the Raspberry Pi. The Pi is a small, single-board computer that’s incredibly popular for projects like this. Help is easy to find online. We used a Raspberry Pi 3, Model B, which retails for around $35. For our setup, the less expensive Raspberry Pi Zero W might have worked just as well.
We’re asking this Raspberry Pi to run two main tasks: Monitor the condition of the reed switch and notify us whenever the door opens.
To start, we hooked up the Pi like a PC to check if it works. We plugged in:
We fired it up and found a working desktop. We configured it to use our office WiFi.
We used VNC viewer to connect to the Raspberry Pi remotely from our desktop PC. That way, we didn't need a keyboard, mouse and monitor wired up to it. With a remote desktop view, we were able to power down the Pi, hook it up in the location near the door, and then just connect from any PC on the network.
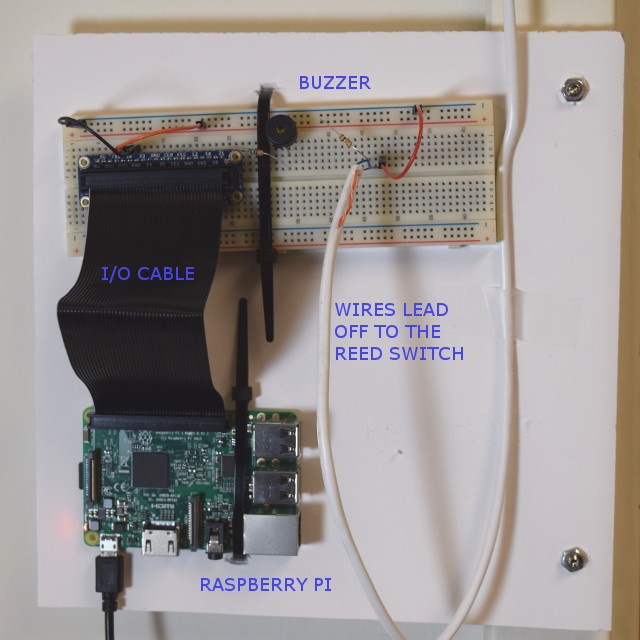
For our alarm testing, we attached the Raspberry Pi and a breadboard to a foamboard sheet. We affixed it to a steel doorframe using two MMS-C-X0 Mounting Magnets. The Pi is powered with a plug into a nearby wall outlet. It's also connected to the breadboard with a 40-pin GPIO cable. (We had this cable from a Raspberry Pi starter kit we bought here.)
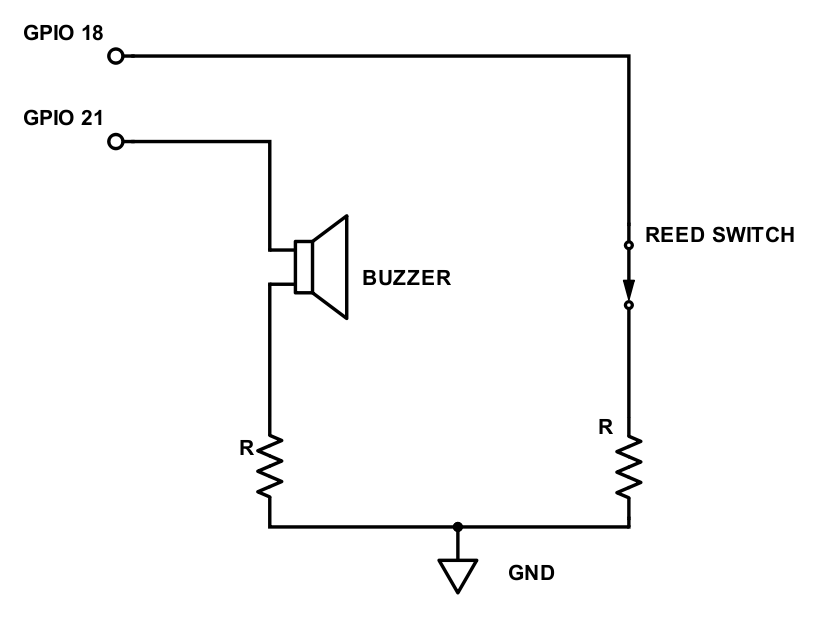
The reed switch is connected to the breadboard and to the Pi as shown in the wiring diagram. We also attached a piezo buzzer to make a sound when the door is open, providing some feedback that the thing is working.
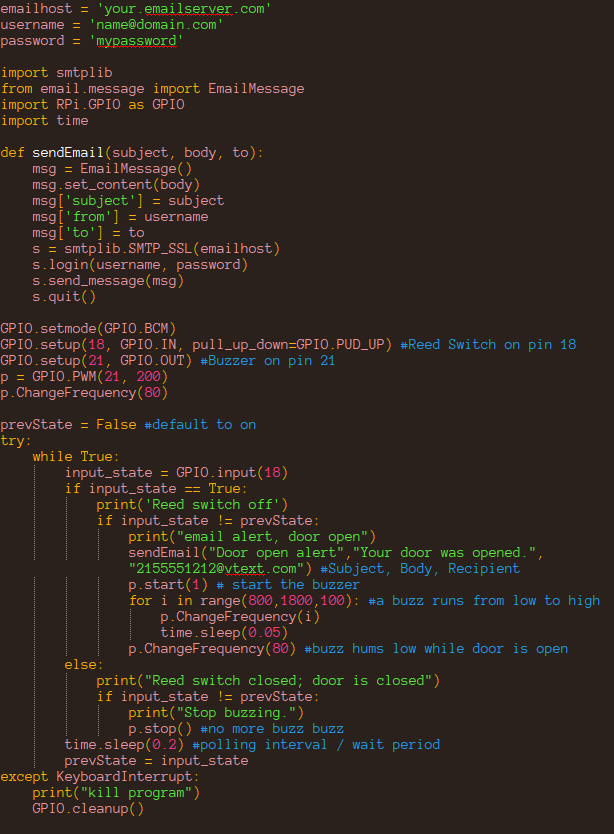
We created a Python script that runs continuously on the Raspberry Pi, monitoring the condition of the door. We set it up to start the script automatically whenever the Pi boots up. That way, the alarm monitoring works even after recovery from a power failure without requiring any action from us.
You can download a copy of our script here.
When running, the script checks the status of the reed switch roughly 5 times per second. When the door opens, it emails an alert and sounds the buzzer. It keeps buzzing until the door closes.
The alert sends a text message or email to whatever address we specify.
That’s where our demo ends, but hopefully it outlines the building blocks for more interesting things you might create. With the status of the door known in software, you could analyze and report the data in all sorts of ways. We can imagine a system with multiple sensors for various doors and windows, all reporting to a single Raspberry Pi.
A few of us are interested in building one of these as a basement flood alarm, where a rising float in the sump might trip the alarm in the same way. It sure would be nice to receive a text before the basement fills up with water!


 Cart
Cart